顯示具有 Corona SDK (English version) 標籤的文章。 顯示所有文章

2015年11月17日 星期二

[Corona SDK] How to support multiple Ads networks - AdMob, iAds, Vungle

InHow to add advertisement in my APP - using AdMob V2, we learn how to add AdMob Ads.
For iAds and Vungle, we can use the similar way to add them.
We just consider how to support multiple networks here.
That it, we want to select AdMobiAds or Vungle dynamically, no matter it is for Fill Rate, eCPM or any other reasons.

Add plugin
First, we need add plug-in in build.settings:
settings =
{
 plugins =
    {
       ["plugin.google.play.services"] =
        {
            publisherId = "com.coronalabs"
        },
        ["CoronaProvider.ads.iads"] =
        {
            publisherId = "com.coronalabs",
            supportedPlatforms = { iphone=true, ["iphone-sim"]=true },
        },
        ["CoronaProvider.ads.vungle"] =
        {
            publisherId = "com.vungle",
        },      
    },
 android =
    {

        usesPermissions =
        {
            "android.permission.INTERNET",
            "android.permission.ACCESS_NETWORK_STATE",
        },
    },
}


Init the Ads
local adsProvider = {"adMob1","adMob2","vungle","iAds"} 
local ads = require( "ads" )
local adMobAdProvider = "admob"
local iAdsAdProvider = "iads"
local vungleAdProvider = "vungle"
local vungleAppId = "55e4xxxxxx"
local bannerAppID = "ca-app-pub-xxxxxx"
local interstitialAppID = "ca-app-pub-xxxxxx"
local appID = "com.gmail.MyCompany.App"
if ( isAndroid ) then
    bannerAppID = "ca-app-pub-xxxxx"
    interstitialAppID = "ca-app-xxxxxx"
    vungleAppId = "com.gmail.My_Company.App"
end
local lastAdsTypeShown = "none"
local currentAds = 1

local function adMobListener( event )
    local msg = event.response
    -- Quick debug message regarding the response from the library
    print( "Message from the adMob library: ", msg )
 if (event.type == "banner") then
     if ( event.isError ) then
         changeToNextAds()
     else
     end
 elseif(event.type == "interstitial") then
        if ( event.isError ) then
            changeToNextAds()
        elseif ( event.phase == "loaded" ) then
        elseif ( event.phase == "shown" ) then
        end
 end  
end

local function iAdsListener( event )
 local msg = event.response
 print("Message received from the iAds library: ", msg)
 if event.isError then
  changeToNextAds() 
 else
 end  
end

local function vungleListener( event )
   print("Message received from the vungleListener library: ", event.type)

   if ( event.type == "adStart" and event.isError ) then
     changeToNextAds()
   elseif ( event.type == "adEnd" ) then
      -- Ad was successfully shown and ended; hide the overlay so the app can resume.
   else
      print( "Received event", event.type )
   end
   return true
end

function adsInit()
 ads.init( adMobAdProvider, bannerAppID, adMobListener )
 if(isAndroid == false) then
   ads.init( iAdsAdProvider, appID, iAdsListener )    
 end
 ads.init( vungleAdProvider, vungleAppId, vungleListener )
end
We have to call ads.init() for AdMob,iAds and Vungle separately.
The parameters in their callback functions are different.
In above codes, we change to next Ads network when we get error.

Change Ads Network
We set new Ads network by function ads:setCurrentProvider().
local function changeToNextAds()
 currentAds = currentAds + 1
 if(currentAds > 3) then
  currentAds = 1
 end
 if(adsProvider[currentAds] == "iAds") then
  ads:setCurrentProvider(iAdsAdProvider)
 elseif(adsProvider[currentAds] == "vungle") then
  ads:setCurrentProvider(vungleAdProvider)
 else
  ads:setCurrentProvider(adMobAdProvider)
 end
end


Show Ads
function showAds(type,px,py)
 if(adsProvider[currentAds] == "adMob") then
  if(type == "banner") then
   ads.show( type, { x=px, y=py, appId=bannerAppID} )
   return true
  elseif(type == "interstitial") then    
   if(ads.isLoaded(type))then
    ads.show( type, { x=px, y=py, appId=interstitialAppID } )
    return true
   else
    return false
   end 
  end 
 elseif(adsProvider[currentAds] == "vungle") then
  if (type == "interstitial" and ads.isAdAvailable() ) then
      ads.show( "interstitial" )
      return true
  else
   return false
  end   
 elseif(adsProvider[currentAds] == "iAds") then
  ads.show( type, { x=px, y=py} )
  return true
 end
 return false  
end

function loadAds()
 if(adsProvider[currentAds] == "adMob") then
  ads.load( "interstitial", { appId=interstitialAppID} )
 end
end 
Vungle does not have Banner Ads and it will pre-load interstitial Ads itself.
iAds cannot pre-load interstitial Ads,
The codes shown above are very completed. 
You can just copy them directly and make it work.

2015年11月16日 星期一

[Corona SDK] How to add Apple Game Center and Android Google Play Game Service

For Apple Game Center or Android Google Play Game Service, 
we just need to utilize the function of gameNetwork.
It is not difficulty to implement them.
To consider Apple and Google at the same time, 
let's check the codes first and see how them work:
local gameNetwork = require( "gameNetwork" )
local playerName
local playerId

local leaderboardsListId=
{
 ["HighestScore"]=
 {
  ["Description"] = "Highest Score",
  ["Identifier"] = "com.gmail.mycom.demo.Leaderboards.HighestScore"
 }
}

local achievementsListId = 
{
 ["FinishLevel1"]=
 {
  ["Description"] = "Finish Level 1",
  ["Identifier"] = "com.gmail.mycom.demo.Achievements.FinishLevel1"
 },
 ["FinishLevel2"]=
 {
  ["Description"] = "Finish Level 2",
  ["Identifier"] = "com.gmail.mycom.demo.Achievements.FinishLevel2"
 }
}

if(isAndroid) then
 leaderboardsListId=
 {
  ["HighestScore"]=
  {
   ["Description"] = "Highest Score",
   ["Identifier"] = "Cgkxxxxxxxx"
  }
 }

 achievementsListId = 
 {
  ["FinishLevel1"]=
  {
   ["Description"] = "Finish Level 1",
   ["Identifier"] = "Cgkxxxxxxx"
  },
  ["FinishLevel2"]=
  {
   ["Description"] = "Finish Level 2",
   ["Identifier"] = "Cgkxxxxxxxx"
  }
 }
end


function showLeaderboards( event )
 print("showLeaderboards()")
 if (playerId ~= nil) then
    if ( isAndroid ) then
       gameNetwork.show( "leaderboards" )
    else
       gameNetwork.show( "leaderboards", { leaderboard = {timeScope="AllTime"} } )
    end
 else
  gameNetworkSetup()
 end
    return true
end

local function postScoreSubmit( event )
   --whatever code you need following a score submission...
   return true
end

local function updateLeaderBoards(type, myScore)
 if (playerId == nil) then
  return
 end

 gameNetwork.request( "setHighScore",
 {
    localPlayerScore = { category=leaderboardsListId[type]["Identifier"], value=tonumber(myScore) },
    listener = postScoreSubmit
 } )
 print("gameNetwork.request( setHighScore) finished")
end

function showAchievements( event )
 print("showAchievements()")
 if (playerId ~= nil) then
    gameNetwork.show( "achievements" )
 else
  gameNetworkSetup()
 end
    return
end

local function achievementRequestCallback( event )
   
   return true
end

local function updateAchievement(type)
 if (playerId == nil) then
  return
 end
 gameNetwork.request( "unlockAchievement",
 {
    achievement = { identifier=achievementsListId[type]["Identifier"], percentComplete=100, showsCompletionBanner=true },
    listener = achievementRequestCallback
 } )
end

local function loadScoresCallback( event ) 
 if(event.data == nil) then
  print("event.data is nil")
  return
 end
 for i=1,25 do
  if(event.data[i] == nil) then
   break
  end
  print("event.data[",i,"].playerID:",event.data[i].playerID)
  print("event.data[",i,"].category:",event.data[i].category)
  if(event.data[i].playerID == playerId) then
   print("matched playID...........")
   break
  end
 end
end

local function loadLocalPlayerCallback( event ) 
 if(event.data == nil) then
  print("event.data is nil")
  return
 end

 playerId = event.data.playerID
 playerName = event.data.alias
 print("loadLocalPlayerCallback(),playerName:",playerName,",playerId:",playerId)
 if(playerId == nil) then
  return
 end
 myGameSettings.gameCerterHasEverLoggedIn = true
 saveData()   

 gameNetwork.request( "loadScores",
            {
                leaderboard =
                {
                    category = leaderboardsListId["HighestScore"]["Identifier"], 
                    playerScope = "Global",   -- Global, FriendsOnly
                    timeScope = "AllTime",    -- AllTime, Week, Today
                    --range = {1,5},
                    playerCentered = true,
                },
                listener = loadScoresCallback
            }) 
end

local function loadAchievementCallback( event )    
 if(event.data == nil) then
  print("event.data is nil")
  return
 end

 for i=1,#event.data do
  if(event.data[i] ~= nil) then
   print("event.data[",i,"].identifier:",event.data[i].identifier)
   print("event.data[",i,"].title:",event.data[i].title)
   print("event.data[",i,"].isCompleted:",event.data[i].isCompleted)
  end
 end 
end

local function gameNetworkLoginCallback( event )
 if(isAndroid==false) then
  if(event.data) then
   print("User has logged into iOS Game Center")
  else
   print("User has NOT logged into iOS Game Center")
   return 
  end
 end
 gameNetwork.request( "loadLocalPlayer", { listener=loadLocalPlayerCallback } )
 gameNetwork.request( "loadAchievements", { listener=loadAchievementCallback } )
 return true
end

local function gpgsInitCallback( event )
 if(event.data) then
  print("User has logged into Google App Play Center")
     gameNetwork.request( "login", { userInitiated=true, listener=gameNetworkLoginCallback } )
 else
  print("User has NOT logged into Google App Play Center")
 end
end

function gameNetworkSetup()
 if ( isAndroid ) then
  myGameSettings.gameCerterHasEverLoggedIn = false
  gameNetwork.init( "google", gpgsInitCallback )
 else
  gameNetwork.init( "gamecenter", gameNetworkLoginCallback )
 end
end
}
Init
In general, we can call gameNetworkSetup() in main.lua
For Android, we need to check if we have logged in successfully in gpgsInitCallback().
For iOS, we need to check if we have logged in successfully in gameNetworkLoginCallback().
The code gameNetwork.request( "loadLocalPlayer", { listener=loadLocalPlayerCallback } ) is to confirm the user who logs in.
You can go without it.
The code gameNetwork.request( "loadAchievements", { listener=loadAchievementCallback } ) is to recover the users's records.
For example, users may have ever installed this APP, remove this APP, and re-install it again.
If you think that you don't need to recover the records for them, you can go with it.

Show leaderboard
To show the leaderboard, we just need to call function showLeaderboards().
In general, we do it when user press some button

Show achievement
To show the leaderboard, we just need to call function showAchievements().
In general, we do it when user press some button.

Update leaderboard

To update leaderboard, we just need to call function updateLeaderBoards().
In general, wwe do it when user finish the game.

Update achievements 

To update leaderboard, we just need to call function updateAchievement().
In general, wwe do it when user finish some round.


Below are what differ between Apple Game Center and Android Google Play Game Service:
Apple Game Center
The data in leaderboardsListId{} and achievementsListId{}:
e.g. "com.gmail.mycom.demo.Leaderboards.HighestScore".
They are user defined, as long as they are  not duplicated.

Google Play Game Service
The data in leaderboardsListId{} and achievementsListId{}:
e.g. "Cgkxxxxxxxx".
They are defined by play store publish when you finished the setting in game center.
For Google Play Game Service, we also need to add the googlePlayGamesAppId in build.settings:
android =
    {
        usesPermissions =
        {
            "android.permission.INTERNET",
            "android.permission.ACCESS_NETWORK_STATE",
            "com.android.vending.BILLING",
        },
        googlePlayGamesAppId = "123456789012" 
    },
usesPermissions are not concerned for game service,
googlePlayGamesAppId is what you get when you link the APP in play store publish game center.

2015年6月16日 星期二

[Corona SDK] How to implement In-App Purchases (IAP)?

It seems that In-App Purchases (IAP) feature is more popular nowadays.
That is, the App itself is free. 
However, if you want to get no-ads version, get all rounds, add some features or retrieve some weapons and so on, you will need to pay then.
This is what called In-App Purchases (IAP).

Below, we will consider about Android and iOS both.
Let's check the common codes shown below first, and discuss them later:
local store
local currentProductList = nil

local appleProductList = {
    {"com.gmail.myTest.DemoApp.GetFullVersion"}
}

local googleProductList = {
    "com.gmail.mytest.demo_app.getfullversion",
}
local function storeTransaction( event )
    local transaction = event.transaction

    if ( transaction.state == "purchased" ) then
     print("transaction.state == purchased")
        if(fullVersion == false) then
         fullVersion = true
     end
    elseif ( transaction.state == "restored" ) then
     --iOS only
     print("transaction.state == restored")
        print( "productIdentifier:", transaction.productIdentifier )
        print( "originalReceipt:", transaction.originalReceipt )
        print( "originalTransactionIdentifier:", transaction.originalIdentifier )
        print( "originalDate:", transaction.originalDate )
       if(fullVersion == false) then
         fullVersion = true
     end
    elseif ( transaction.state == "refunded" ) then
     --refunds are only supported by the Android
     print("transaction.state == refunded")        
        print( "productIdentifier:", transaction.productIdentifier )
        if(fullVersion == true) then
         fullVersion = false
     end
    elseif ( transaction.state == "consumed" ) then
     --consumed are only supported by the Android
     print("transaction.state == consumed")        
        print( "productIdentifier:", transaction.productIdentifier )
  if(fullVersion == true) then
   fullVersion = false
  end
  elseif event.transaction.state == "cancelled" then
   --For iOS, if user cancels the IAP action, it will come to here 
   print("transaction.state == cancelled")
  elseif event.transaction.state == "failed" then 
   --[[
   -1003: unknown
   -1005: user canclled,For Android, if user cancels the IAP action, it will come to here
  -7: already owned
  8: item not owned
   ]]
   print("transaction.state == failed")
   print("Transaction failed, type:"..tostring(event.transaction.errorType)..",-1005")
   print("Transaction failed, error:"..tostring(event.transaction.errorString)) 
    end    

    store.finishTransaction( event.transaction )
end


if ( isAndroid ) then
    store = require( "plugin.google.iap.v3" )
    currentProductList = googleProductList
    store.init( "google", storeTransaction )     
else
    store = require( "store" )
    currentProductList = appleProductList
    store.init( "apple", storeTransaction )
end 

--put the following codes somewhere, such as when user press some button 
if(store.canMakePurchases) then
 store.purchase( currentProductList[1] )
end

Android
First, you need to add your App in Play Store Publish.
After that, enter the need added App and then add the In-App products.
There are three types of IAP products for google IAP: managed, unmanaged and subscription.
Managed: It is for one-time shopping, e.g. changed from lite version to full version.
For this kind of products, Google will store the purchase information.
If user change phones or re-install the App, they can restore those managed products from Google server if they are using the same accounts.
Unmanaged: It is for those products which can be purchased again and again, e.g. weapons or blood
values of roles.
The Google server will not store the purchases records.
That is, the developers need to have some ways to store such information themselves.
Subscription: Let's not discuss it currently.

After that, we need to fill the IAP item id in googleProductList, as shown in above codes.

In Play Store Publish, go to the "Services & APIs" page and get the license key for this application.
It is a very long string. Just copy it and paste to the key field in config.lua:
application = 
{
 content = 
 { 
  width = 640,
  height = 960, 
  scale = "zoomStretch",
 },
 license =
    {
        google =
        {
            key = "xxxxxxxxxxxxxxxxxxxxxxxxxxxxxxxxxxxxxxxxxxxxxxxxxxxxxxxxxxxxxxxxxxxxxxxxxxxxxxxxxxxxxxxxxxxxxxxxxxxxx",
        },
    },
}


Next, we need to add the plugins and permissions in build.settings:
settings =
{
 plugins =
    {
        ["plugin.google.iap.v3"] =
        {
            publisherId = "com.coronalabs",
            supportedPlatforms = { android=true }
        },        
    },
 android =
    {
        usesPermissions =
        {
            "com.android.vending.BILLING",
        },
    },
}

Purchase
To purchase, we only need to call store.purchase( currentProductList[1] ).
However, we need to upload the built apk file to Play Store Publish first.
The version code of  uploaded apk file should be the same as what apk you want to test.
You can modify your codes and build many times, just remember to use the same version code.
We can upload to ALPHA testing or BETA testing.
If there is no apk file with same version code in Play Store Publish, you will get error message telling that the IAP function is not provided in this version.
In above codes, we check store.canMakePurchases before calling store.purchase( currentProductList[1] ). 
store.canMakePurchases is for iOS only. It will be true always for Android platform.

After purchasing successfully, the callback function storeTransaction will enter transaction.state == "purchased".
We can modify the related authorization there.

Test
We are not allow to test IAP function with the same account.
We need to get another account for testing.
If the account in your phone is the same as your developer account, you need to back to factory default and set new account.

We can go to Play Store Publish, find the setting page and then add the test account.
When you purchase your IAP products with this testing account, it will not spend you any money.

During our test, we are not sure if the problems are caused by wrong coding, or by wrong setting in Play Store Publish.
Google suggest us that we should do what called "Static Responses" test first.
That is, we can replace the items in googleProductList to be following items:
"android.test.purchased"
"android.test.canceled"
"android.test.refunded"
"android.test.item_unavailable"
These items are defined by Google.
We don't need to set anything IAP items in Play Store Publish in advance.
We don't need to upload our apk file either.
We'd better use them to test our IAP related codes first.

Refund
Google allow user to perform refund after purchasing.
Basically, we just need change the related authorization in  transaction.state == "refunded" of callback function storeTransaction.

Comsuming items
This is Google specific feature.
If your item is managed type, you may need to re-purchase after you modify some error codes.
We can consume the purchased record in Google server:
store.consumePurchase( currentProductList[1], storeTransaction )
The callback function storeTransaction should enter transaction.state == "consumed" then.
After that, we can perform store.purchase( currentProductList[1] ) again.
If you don't do store.consumePurchase(), you will get the error message in transaction.state == "failed", which tells you that the item is already owned.

Restore
If users have ever bought the managed products, they may install your App in different devices or re-install your App with the same account.
We need to restore the related authorization by following method:
store.restore( )
After calling it, the callback function storeTransaction will enter transaction.state == "purchased".
Google does not ask when or how we should do restore.
We can perform restore automatically or add a restore button.
If user did not buy it before, nothing will happen after calling store.restore( ) .
As mentioned above, doing purchase again will get error message "already owned", instead of entering transaction.state == "purchased" or transaction.state == "restored" 
We have to call store.restore( ) somewhere.

iOS
You have to visit iTunes Connect to add your new App.
We can add IAP products after adding new App successfully.
There are five types of IAP products provide by Apple.
Consumable products are similar with unmanaged products mentioned above.
Non-Consumable products are similar with managed products mentioned above.

Similarly, we need to fill the IAP item id in appleProductList of our codes.
Note that appleProductList is in table format, which is different from googleProductList.

Purchase
To purchase, we need call store.purchase( currentProductList[1] ).
We have to check store.canMakePurchases because iOS devices have a setting that disables purchasing.
After purchasing successfully, the callback function storeTransaction will enter transaction.state == "purchased".
We can modify the related authorization there.

Test
Our App has not been published to Store.
When we do IAP test, we will get the error message telling that the App cannot connect with iTunes Store.
To test it, we need to setup the sandbox environment.
Visit iTunes Connect, go to the "Manage Users" page and add the test counts.
The added accounts cannot be any accounts which have already existed.
That is, you can use those accounts in your phones or tablets.
We have to create a new Apple id for testing.
A suggested way is to combine your original account with test1, test2, and so on.
For example, if your phone Apple id is "ABC", then you can add test account "ABC+test1", "ABC+test2"....
Apple does not offer the function for eliminating purchased record, like store.consumePurchase() for Android we mentioned before.
If your products are non-consumable products, you will need to create many test accounts.
For Apple, if we do store.purchase() for the item which has been purchased, it will tell you that this item has been purchased and you can get it free for one more time.
It will not return error message as Google platform.
After purchasing, the callback function storeTransaction will enter transaction.state == "purchased" as well.
Anyway, we'd better test with new account which has never bought any items before.

Restore
If users have ever bought the managed products, they may install your App in different devices or re-install your App with the same account.
We need to restore the related authorization by following method:
store.restore( )
After calling it, the callback function storeTransaction will enter transaction.state == "restored".
Apple ask that if your App has non-consumable products inside, then you need to provide the restore button.
That is, we should perform restore after user triggering it.
We cannot restore it automatically.
Why?
Because if we perform restore automatically, it will pop up the window for asking password.
Users may feel strange for showing up such menu automatically.
As we mentioned in last paragraph, if we perform purchase for the purchased products, we can restore the purchased items too. It is free.
Why do we need the restore button? 
Can we just ask user to press the purchase button again?
We do need the restore button.
Users may feel that they need to pay again for pressing purchase button.
The message about getting the products again for free is shown up after you press the purchase button.


For Android Play Store Publish or iOS iTunes Connect, you need to wait for a while to take effect after you set up a new IAP product.
It may take few hours sometimes.


2015年6月11日 星期四

[Corona SDK] How to add advertisement in my APP - using AdMob V2

We may want to integrate advertising bar or page in our APP.
Let's take AdMob as our example.

First, you need to visit AdMob to apply for an account.
After that, you can add the APP which you want to has Ads.
I will skip the detailed steps for that.
Basically, there have two types of Ads for AdMob.
One is called banner, and the other one is interstitial.
If your APP will be for Android and iOS platforms both, you need to apply for the Ads Unit ID separately.
That is, you will get 4 Ads Unit IDs.
Let's check the coding part.

Add plugin
First, we need to add plugin in build.settings:
settings =
{
 plugins =
    {
        ["plugin.google.play.services"] =
        {
            publisherId = "com.coronalabs"
        },        
    },
 android =
    {

        usesPermissions =
        {
            "android.permission.INTERNET",
            "android.permission.ACCESS_NETWORK_STATE",
        },
    },
}
As you can see, we also need to add access right for Android system.

Show the Ads
To show the Ads, we just need to program as follow:
local ads = require( "ads" )
local bannerAppID = "ca-app-pub-3001435268155896/xxxxxxxxxx"  --for your iOS banner
local interstitialAppID = "ca-app-pub-3001435268155896/xxxxxxxxxx"  --for your iOS interstitial
if ( system.getInfo("platformName") == "Android" ) then
    bannerAppID = "ca-app-pub-3001435268155896/xxxxxxxxxx"  --for your Android banner
    interstitialAppID = "ca-app-pub-3001435268155896/xxxxxxxxxx"  --for your Android interstitial
end

local adProvider = "admob"

local function adListener( event )
    local msg = event.response
    print( "Message from the ads library: ", msg )
 if (event.type == "banner") then
     if ( event.isError ) then
         print( "Error, no bannser ad received", msg )
     else
         print( "Got one banner AD" )
     end
 elseif(event.type == "interstitial") then
        if ( event.isError ) then
            print( "Error, no interstitial ad received", msg )
        elseif ( event.phase == "loaded" ) then
            print("interstitial ads got...")
        elseif ( event.phase == "shown" ) then
            print("interstitial has been shown and closed") 
        end
 end
end

ads.init( adProvider, bannerAppID, adListener )

ads.show( "banner", { x=0, y=0, appId=bannerAppID} )--show banner ads

ads.show( "interstitial", { x=0, y=0, appId=interstitialAppID} )--show banner ads

ads.hide() -- hide the ads
The bannerAppID and interstitialAppID are the Unit ID that  you get from AdMob websit.

We only need to call ads.init() one time.
You can pass in any type of appId.
In ads.show(), we pass in the Ads type and related appId then.

Banner Ads
ads.show( "banner", { x=0, y=0, appId=bannerAppID} ) can show the banner Ads.
The parameters {x=0, y=0} mean than we what to locate the banner in the top side.
You can decide whether to show it, as long as it will not affect the process of game.
If you want to have Ads, you'd better consider the best location for it when you are doing UI layout.

In general, we will put it in the top side or bottom side.
The reserved width should be screen-wide.
However, what about the height?
There is so called Smart Banners for AdMob.
When it is showing in phones, its height will be 32 for Landscape mode, and will be 50 for Portrait mode.
When it is showing in tablets, its height will be 90.
However, I did get banner with height in one of my phones.
Just in case, we can reserve 90 or even 100 height if possible.
It will be suitable for all cased.

Interstitial Ads 
For Interstitial Ads, it will occupy the whole screen.
It doesn't matter for what values of parameters x and y you pass in.
You should not show Interstitial Ads too frequent.
Otherwise, the user will feel that it is annoying.

The loading of Interstitial Ads may take a while.
We'd better load it in advance before showing it, as shown below:
ads.load( "interstitial", { appId=interstitialAppID } ) --load the "interstitial" ads in advance
Once it has been loaded, it will show up immediately when we call ads.show()
Before showing, we need to check if it has been loaded.
if(ads.isLoaded("interstitial"))then
 ads.show( "interstitial", { x=0, y=0, appId=interstitialAppID } )
end
Please note that once we call ads.show(), even we call ads.show( "banner", { x=0, y=0, appId=bannerAppID} ) to show the banner ads, ads.isLoaded("interstitial") will be false.
That is, the pre-loaded data will be cleared.
We need to call ads.load( "interstitial", { appId=interstitialAppID } ), ads.isLoaded("interstitial") again after we calling ads.show().
However, for Android system, once we have ever called ads.load( "interstitial", { appId=interstitialAppID } ), it will reload the data automatically.
That is, ads.isLoaded("interstitial") will be true later automatically after it has got the Interstitial Ads.
For iOS system, it will not reload it automatically. Not sure the reason.

The Ads function can only work on real devices.
We'd better add some judgement for above codes.
That is, adding system.getInfo( "environment" ) ~= "simulator" in our codes.

2015年6月3日 星期三

[Corona SDK] How to localize your APP title - Android part

In [Corona SDK] How to localize your APP title - iOS part, we have learn how to localize the APP title for iOS system.
For Android APP, such function is available in Enterprise version.
However, I think most people are using free version.
So..how should we do?

The Android apk file is just a compressed format.
First, we need to prepare two tools, one is apktool, the other is zipalign.
These two tools should be found in Android SDK.
If you don't have, please search them on internet.

We can put the apk file and related tools in the same folder.

myAndroidApp.apk is the target apk we want to modify.
For convenience, I create some bat files.
Let's look at their contents.
(The following actions are done in Windows environment)

apktool.bat
if "%PATH_BASE%" == "" set PATH_BASE=%PATH%
set PATH=%CD%;%PATH_BASE%;
java -jar -Duser.language=en "%~dp0\apktool.jar" %1 %2 %3 %4 %5 %6 %7 %8 %9
unpack.bat
apktool d %1
pack.bat
apktool b %1 -o %2
sign.bat
jarsigner -verbose -sigalg MD5withRSA -digestalg SHA1 -keystore "my.keystore" %1 yourPassword
zipalign -v 4 %1 zip-%1 
del %1 
ren zip-%1 %1
Remember to change yourPassword as yours in sign.bat

1. In command shell, input unpack "myAndroidApp.apk"
It will unpack myAndroidApp.apk to the folder myAndroidApp
2. Enter the folder myAndroidApp\res\values, if the file strings.xml is there, open it.
If not, create a new one. 
Modify its content as:
<resources>
    <string name="appTitle">Your Title</string>
</resources>
3. If we want to add other languages, say French.
We need to create a new folder values-fr under myAndroidApp\res.
Again, create strings.xml under folder values-fr.
The content of  strings.xml is the same as what we do in step, except for that Your Title should be translated into French or any other titles you want.
4. For supporting a new language, we just repeat step 3, except for that the folder names are different.
For example, values-ja is for Japanese, while values-it is for Italian.
5. Return to the folder myAndroidApp, open file AndroidManifest.xml.
Search android:label="xxx" and change it to be android:label="@string/appTitle".
There should have two places. Both of them need to be modified.
Someone said that FileContentProvider should be modified as well.
However, if you do it, you will get run time error when you start the  APP.
6. In command shell, input  pack myAndroidApp  newApp.apk
7. In command shell, input  sign newApp.apk

Done...


2015年6月2日 星期二

[Corona SDK] How to localize your APP title - iOS part

In [Corona SDK] How to support multi-language (localize your APP),
we know how to support multi-languages.
However, the method mentioned above only worked when the APP has been started.
How about the APP title?
Can we solve this problem before the APP start?

Let's check how should we do for iOS first....
Assume that we want to support English and Spanish.
We need to modify build.settings as follow:
iphone =
{
 plist =
 {
     CFBundleLocalizations={
            "en",
            "es",
      },
      CFBundleDisplayName = "myAppTitle",
      CFBundleName = "myAppTitle"",
    }
 }
After that, we need to add some folders for those languages we want to support.
For example, we will add folder "en.lproj" and "es.lproj" for our case.
In the folders we just added, we all need to add  one file "InfoPlist.strings",
In  "InfoPlist.strings", we need to add:
"CFBundleDisplayName"="myAppTitle";
"CFBundleName"="myAppTitle";
The above example is for "en.lproj".
Other languages are similar.

[Corona SDK] How to support multi-language (localize your APP)

If we only want to support one language, it will be quite simple for programming.
We can code it  as:
display.newText("hello", 200, 200, native.systemFontBold, 36 )

But, what if we want to support more than two languages?

First, we need to get the information of languages for current settings in user phones.
For Android system, we may use system.getPreference( "locale", "language" ) to get such information.
For iOS, we may use system.getPreference( "ui", "language" ).
However, it will be complicated for Chinese.
There have so-called Simplified Chinese and Traditional Chinese.
To overcome such problem, you can reference the following codes:
language = "en"
isAndroid = false
if(system.getInfo("platformName") == "Android") then
 isAndroid = true
end
if(isAndroid) then
 language = system.getPreference( "locale", "language" )
else
 language = system.getPreference( "ui", "language" )
end

local localeLanguage = system.getPreference( "locale", "language" ):upper()
local localeCountry = system.getPreference( "locale", "country" ):upper()
local uiLanguage = system.getPreference( "ui", "language" ):upper()

if(localeLanguage == "ZH-HANT" or localeLanguage == "ZH_HANT" or uiLanguage == "ZH-HANT" or uiLanguage == "ZH_HANT") then
 language = "zh-Hant"
elseif(localeLanguage == "ZH-HANS" or localeLanguage == "ZH_HANS" or uiLanguage == "ZH-HANS" or uiLanguage == "ZH_HANS") then
 language = "zh-Hans"
elseif(localeLanguage == "中文" or localeLanguage == "ZH" or uiLanguage == "中文" or uiLanguage == "ZH") then
 if(localeCountry == "TW") then
  language = "zh-Hant"
 else
  language = "zh-Hans"
 end
end
After getting the language setting, we need to take care of display problem.
We can add a new multi-language translation file, such as translations.lua as show below:
local translations =
{
    ["hello"] =
    {
        ["en"] = "hello",        
        ["zh-Hant"] = "哈囉",
        ["zh-Hans"] = "哈啰",
        ["fr"] = "Salut",
        ["de"] = "Hallo",

    },      
}

return translations
When we want to display the text, we can code it as:
translations = require("translations")
display.newText( translations["hello"][language], 200, 200, native.systemFontBold, 36 )

2015年5月12日 星期二

[Corona SDK] How can we store and retrieve the game setting data?

To store the data, we can use file:write() to write to the specified file.
After that, we can use file:read() to retrieve them.
However, the game setting data are recorded in table format in most cases.
The functions file:write() and file:read() are both accepted string type as the input/output.
We need to use json to encode table into string and decode string into table, as shown below:
local json = require("json")

function saveTable(myTable, filename)
    local path = system.pathForFile( filename, system.DocumentsDirectory)
    local file = io.open(path, "w")
    if file then
        local sTable = json.encode(myTable)--encode the table to string
        file:write( sTable )
        io.close( file )
        return true
    else
        return false
    end
end

function loadTable(filename)
    local path = system.pathForFile( filename, system.DocumentsDirectory)
    local contents = ""
    local myTable = {}
    local file = io.open( path, "r" )
    if file then         
         local sTable = file:read( "*a" )-- read the entire contents of the file
         myTable = json.decode(sTable)--decode the string back to table
         io.close( file )
         file = nil
         return myTable 
    end
    return nil
end

Next, how to use the above functions in our codes?
gameSettingsFileName = "mygamesettings.json"
currentSettingsVersion = 3

myGameSettings = loadTable("mygamesettings.json")
if(myGameSettings == nil or myGameSettings.version == nil or myGameSettings.version ~= currentSettingsVersion) then
        -- the default settings
 myGameSettings = {}
 myGameSettings.version = currentSettingsVersion
 myGameSettings.level = 2
 myGameSettings.speed = 5 
 saveTable(myGameSettings, gameSettingsFileName)
end

myGameSettings.level = myGameSettings.level+1
saveTable(myGameSettings, gameSettingsFileName)

2015年4月30日 星期四

[Corona SDK] How to design Segmented Control with our own style?

Segmented Control is very useful in widget tools.
Assume that we have 4 items for user to select.
We can use the following example:
display.setStatusBar( display.HiddenStatusBar )
local widget = require( "widget" )
-- Listen for segmented control events      
local function onSegmentPress( event )
    local target = event.target
    print( "Segment Label is:", target.segmentLabel )
    print( "Segment Number is:", target.segmentNumber )
end

-- Create a default segmented control
local segmentedControl = widget.newSegmentedControl
{
    left = 36,
    top = 150,
    segmentWidth = 24,
    segments = { "1", "2", "3", "4" },
    defaultSegment = 2,
    onPress = onSegmentPress
}
Check the result:

Not bad...
However, you will find that the width of item can be adjusted by segmentWidth.
How about the height value? 
It seems that we cannot modify it.
On the other hand, we may want to have our own style.
How to do?

First, we need to prepare a image file as the source of ImageSheet.
It should include 7 pictures, which are the left/middle/right frames for unselected items, and the left/middle/right frames for selected items. The last one is the divider of segment frame.
The image file:
The codes should be modified as below:
display.setStatusBar( display.HiddenStatusBar )
local widget = require( "widget" )
-- Listen for segmented control events      
local function onSegmentPress( event )
    local target = event.target
    print( "Segment Label is:", target.segmentLabel )
    print( "Segment Number is:", target.segmentNumber )
end

local options = {
     frames = 
     {
         { x=0, y=0, width=24, height=20 },
         { x=26, y=0, width=24, height=20 },
         { x=52, y=0, width=24, height=20 },
         { x=78, y=0, width=24, height=20 },
         { x=104, y=0, width=24, height=20 },
         { x=130, y=0, width=24, height=20 },
         { x=156, y=0, width=1, height=20 }
     },
     sheetContentWidth = 157,
     sheetContentHeight = 20
 }
 local segmentSheet = graphics.newImageSheet( "imageSheet.png", options )
 local segmentedControl = widget.newSegmentedControl
 {
     left = 100,
     top = 100,     

     sheet = segmentSheet,
     leftSegmentFrame = 1,
     middleSegmentFrame = 2,
     rightSegmentFrame = 3,
     leftSegmentSelectedFrame = 4,
     middleSegmentSelectedFrame = 5,
     rightSegmentSelectedFrame = 6,
     segmentFrameWidth = 24,
     segmentFrameHeight = 20,

     dividerFrame = 7,
     dividerFrameWidth = 1,
     dividerFrameHeight = 20,

     labelSize=12,
  labelColor = { default={ 0.5, 0.5, 0.5 }, over={ 1, 1, 1 } },
     segmentWidth = 24,
     segments = { "1", "2", "3", "4", "5"},
     defaultSegment = seg,
     onPress = onSegmentPress
 } 
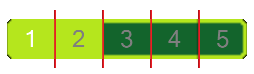
Check the result:
It does not look right. 
There are two issues. 
First, item 1 and item 2 are highlighted at the same time.
Second, the height of divider is not correct. It is system default setting, but not 20 as expected.

For issue 1, we can modify the width for frame 4 (leftSegmentSelectedFrame).
We just minus it by the width of divider:
local options = {
     frames = 
     {
         { x=0, y=0, width=24, height=20 },
         { x=26, y=0, width=24, height=20 },
         { x=52, y=0, width=24, height=20 },
         { x=78, y=0, width=23, height=20 },
         { x=104, y=0, width=24, height=20 },
         { x=130, y=0, width=24, height=20 },
         { x=156, y=0, width=1, height=20 }
     },
     sheetContentWidth = 157,
     sheetContentHeight = 20
 }
That is, we need to let its value to be less than segmentWidth.

For issue 2, we need to remove segmentedControl and add it again:
local segmentedControl = widget.newSegmentedControl
 {
     left = 100,
     top = 100,     

     sheet = segmentSheet,
     leftSegmentFrame = 1,
     middleSegmentFrame = 2,
     rightSegmentFrame = 3,
     leftSegmentSelectedFrame = 4,
     middleSegmentSelectedFrame = 5,
     rightSegmentSelectedFrame = 6,
     segmentFrameWidth = 24,
     segmentFrameHeight = 20,

     dividerFrame = 7,
     dividerFrameWidth = 1,
     dividerFrameHeight = 20,

     labelSize=12,
  labelColor = { default={ 0.5, 0.5, 0.5 }, over={ 1, 1, 1 } },
     segmentWidth = 24,
     segments = { "1", "2", "3", "4", "5"},
     defaultSegment = seg,
     onPress = onSegmentPress
 } 
 segmentedControl:removeSelf( )
 local segmentedControl = widget.newSegmentedControl
 {
     left = 100,
     top = 100,     

     sheet = segmentSheet,
     leftSegmentFrame = 1,
     middleSegmentFrame = 2,
     rightSegmentFrame = 3,
     leftSegmentSelectedFrame = 4,
     middleSegmentSelectedFrame = 5,
     rightSegmentSelectedFrame = 6,
     segmentFrameWidth = 24,
     segmentFrameHeight = 20,

     dividerFrame = 7,
     dividerFrameWidth = 1,
     dividerFrameHeight = 20,

     labelSize=12,
  labelColor = { default={ 0.5, 0.5, 0.5 }, over={ 1, 1, 1 } },
     segmentWidth = 24,
     segments = { "1", "2", "3", "4", "5"},
     defaultSegment = seg,
     onPress = onSegmentPress
 } 
The final result:
The method shown above is just a workaround....

2015年4月29日 星期三

[Corona SDK] How can we decide if the collision will happen or not for each object?

In [Corona SDK] How to detect the collision for physical objects - using Global Collision, we find that all objects will collide with each other.
We can then decide how to deal with the collision in function onGlobalCollision().
What if we wish that fruit1 and fruit2 will not collide with each other?
For it, we need to add the parameter filter, as shown below:
local main = display.newImage( "main.png", 160, 240 )
local mainCollisionFilter = { categoryBits=2, maskBits=1023 } 
physics.addBody( main, { density = 1.0, friction = 0.3, bounce = 0.2 , filter=mainCollisionFilter} )
main.myName = "main"

local fruit1 = display.newImage( "fruit.png", 100, 120 )
local fruit1CollisionFilter = { categoryBits=4, maskBits=2 } 
physics.addBody( fruit1, { density = 1.0, friction = 0.3, bounce = 0.2, filter=fruit1CollisionFilter} )
fruit1.myName = "fruit1"

local fruit2 = display.newImage( "fruit.png", 300, 220 )
local fruit2CollisionFilter = { categoryBits=8, maskBits=6 } 
physics.addBody( fruit2, { density = 1.0, friction = 0.3, bounce = 0.2, filter=fruit2CollisionFilter } )
fruit2.myName = "fruit2"

local fruit3 = display.newImage( "fruit.png", 300, 220 )
physics.addBody( fruit3, { density = 1.0, friction = 0.3, bounce = 0.2 } )
fruit3.myName = "fruit3"
The parameter categoryBits is used to set the category of that object.
Basically, this value will be unique for each object if we want to distinguish them.
categoryBits is set in bit level since it will cooperate with maskBits.
Of course, we can set the same categoryBits for different objects, if we want them to have similar behaviors. 
categoryBits can also be set to 1 for multiple bits, such as 7.
The final behavior will be decided by the result of mask operation with maskBits.
We can show the filter setting of above codes by the chart:
For fruit3, it does not specify the parameter filter. Its default setting will be { categoryBits=1, maskBits=1023 }, which means that it will collide with all other objects.
It there may have some objects without filter setting, we'd better set categoryBits start from 2 for those object with filter.
Besides, in the example, the maskBits for fruit2 is 6. It means that it wish to collide with main and fruit1.
However, the maskBits for fruit1 is 2, which means that it does not want to collide with fruit2.
The mask operation is the result of AND for all values.
fruit1 will not collide with fruit2 in the end.

[Corona SDK] How to detect the collision for physical objects - using Global Collision

For detection of collision, we can use Local Collision or Global Collision.
Below is the usage of Global Collision:
local main = display.newImage( "mainRole.png", 160, 240 )
physics.addBody( main, { density = 1.0, friction = 0.3, bounce = 0.2 } )
main.myName = "mainRole"

local fruit1 = display.newImage( "fruit.png", 100, 120 )
physics.addBody( fruit1, { density = 1.0, friction = 0.3, bounce = 0.2 } )
fruit1.myName = "fruit1"

local fruit2 = display.newImage( "fruit.png", 300, 220 )
physics.addBody( fruit2, { density = 1.0, friction = 0.3, bounce = 0.2 } )
fruit2.myName = "fruit2"

local function onGlobalCollision( event )

    if ( event.phase == "began" ) then        
        if((event.object1.myName=="mainRole" and event.object2.myName=="fruit1") or (event.object1.myName=="fruit1 and event.object2.myName=="mainRole")) then
         print( "began: " .. event.object1.myName .. " and " .. event.object2.myName )         
         if(fruit1 ~= nil) then
          print("Remove fruit1")
          fruit1:removeSelf( )
    fruit1 = nil
         end
        elseif((event.object1.myName=="mainRole" and event.object2.myName=="fruit2") or (event.object1.myName=="fruit2" and event.object2.myName=="mainRole")) then
         print( "began: " .. event.object1.myName .. " and " .. event.object2.myName )         
         if(fruit2 ~= nil) then
          print("Remove fruit2")
          fruit2:removeSelf( )
    fruit2 = nil
         end
        end

    elseif ( event.phase == "ended" ) then
        print( "ended: " .. event.object1.myName .. " and " .. event.object2.myName )
    end
end

Runtime:addEventListener( "collision", onGlobalCollision )
We add the specific name for each object.
When the collision happens, we can know which two objects collide with each other by verify the object names.

However, when we run the codes shown above, we may find that sometimes Runtime error will happen.
In executing fruit1:removeSelf( ), it will tell you that fruit1 is nil.
It is strange since we do check if(fruit1 ~= nil).
For fruit2, the problem is similar.

From the log message, the code print( "began: " .. event.object1.myName .. " and " .. event.object2.myName ) may run few times, and then execute print("Remove fruit1") after that.
It seems that this function is multi-entry.
multi-entry function without critical section mechanism to protect it is liable to corrupt the data.
To solve this problem, we can make the removal of objects to other place, like the following codes:
local removeFruit1 = false
local removeFruit2 = false
local main = display.newImage( "mainRole.png", 160, 240 )
physics.addBody( main, { density = 1.0, friction = 0.3, bounce = 0.2 } )
main.myName = "mainRole"

local fruit1 = display.newImage( "fruit.png", 100, 120 )
physics.addBody( fruit1, { density = 1.0, friction = 0.3, bounce = 0.2 } )
fruit1.myName = "fruit1"

local fruit2 = display.newImage( "fruit.png", 300, 220 )
physics.addBody( fruit2, { density = 1.0, friction = 0.3, bounce = 0.2 } )
fruit2.myName = "fruit2"

local function onGlobalCollision( event )

    if ( event.phase == "began" ) then        
        if((event.object1.myName=="mainRole" and event.object2.myName=="fruit1") or (event.object1.myName=="fruit1 and event.object2.myName=="mainRole")) then
         print( "began: " .. event.object1.myName .. " and " .. event.object2.myName )         
         removeFruit1 = true
        elseif((event.object1.myName=="mainRole" and event.object2.myName=="fruit2") or (event.object1.myName=="fruit2" and event.object2.myName=="mainRole")) then
         print( "began: " .. event.object1.myName .. " and " .. event.object2.myName )         
         removeFruit2 = true
        end

    elseif ( event.phase == "ended" ) then
        print( "ended: " .. event.object1.myName .. " and " .. event.object2.myName )
    end
end

Runtime:addEventListener( "collision", onGlobalCollision )

local function removeAction()
 if(removeFruit1) then
   if(fruit1 ~= nil) then
      print("Remove fruit1")
      fruit1:removeSelf( )
      fruit1 = nil
      removeFruit1 = false
   end
 end
 if(removeFruit2) then
   if(fruit2 ~= nil) then
     print("Remove fruit2")
     fruit2:removeSelf( )
     fruit2 = nil
     removeFruit2 = false
   end
 end 
end
 
timer.performWithDelay( 50, removeAction,-1 )

2015年4月28日 星期二

[Corona SDK] How to detect double-tapped?

If we want to check if user has touched the screen, we can use Tap Detection or Touch Detection.
If we want to know if user has double-tapped the screen, to use Tap Detection is better.
Example shown as below:
local function buttonListener( event )

    if ( event.numTaps == 1 ) then
        print( "single-tapped" )
        runSingleTappedAction()
    elseif ( event.numTaps == 2 ) then
        print( "double-tapped" )
        runDoubleTappedAction()
    else
        return true
    end
end

local myButton = display.newRect( 160, 240, 120, 60 )
myButton:addEventListener( "tap", buttonListener )
For double-tapped, it will happen following single-tapped event.
That is, it will execute runSingleTappedAction() first, and then execute runDoubleTappedAction().
What if we do not want to execute runSingleTappedAction() for double-tapped event?
To achieve that, we should wait for a while before running action, since we need to confirm if it is single-tapped or double-tapped.
Example shown below:
local tapCount=0
local timeId = nil
function runTapAction( event )
 if ( tapCount == 1 ) then
     print( "single-tapped" )   
     runSingleTappedAction() 
 elseif ( tapCount == 2 ) then
     print( "double-tapped" )
     runDoubleTappedAction()
 end
end

local function buttonListener( event )
 tapCount = event.numTaps
 if(timeId ~= nil) then
   timer.cancel( timeId )
 end
 timeId = timer.performWithDelay( 200, runTapAction,1 )
end

local myButton = display.newRect( 160, 240, 120, 60 )
myButton:addEventListener( "tap", buttonListener )
Of course, we will sacrifice the response time for single-tapped event.

2015年4月23日 星期四

[Corona SDK] How to call those functions in other .lua files?

Corona SDK APIs are classified according to their purposes, such as display.*,  os.*, and so on.
If we have functions with similar purposes, we can also put them in the same .lua file.
How can we call them after that?

Assume that we have one file named GameScenario.lua, which is used to configure the setting for each round:
gameScenario = {}

local function configureGameScenario(round)
 print("configureGameScenario():"..round)
end--local function configureGameScenario()

gameScenario.configureGameScenario = configureGameScenario
return gameScenario
configureGameScenario() will decide the setting according to the input parameter round.

To call it from other file:
local gameScenario = require("GameScenario")
gameScenario.configureGameScenario(1)

The above method is to utilize the powerful table of lua.

2015年4月22日 星期三

[Corona SDK] How to load or restart current scene

If we want to change the scene, we can call composer.gotoScene( xxx ).
However, what if we want to reload current scene?
Of course, we can call composer.gotoScene( xxx ), where "xxx" is the name of current scene.

However, you will find that scene:create() is not called.
Only scene:show() is exceuted.
You may move the codes in scene:create() to scene:show() if you want.

Are there any other ways?
We could use storyboard.reloadScene() before.
However, this method is obsolete.
What should we do now?

The simple way is to use a dummy scene.
We can change to the dummy scene and then change back immediately.

local options ={
 effect = "fade",
 time = 0,
 params =
 {
  myData = 1234
 }
}
composer.gotoScene( "RestartDummy", options )
The parameter time can set to be 0 which means that we want to change immediately.
The params are those parameters we want to pass to "RestartDummy".
The codes of "RestartDummy":
local composer = require( "composer" )
local scene = composer.newScene()

function scene:create( event ) 
 print( "((create scene RestartDummy's view))" ) 
 local params = event.params
 print(params.myData)
end --function scene:create( event )

function scene:show( event ) 
 local phase = event.phase 
 if "did" == phase then 
  print( "((show scene RestartDummy's view))" ) 
  composer.removeScene( xxx ) 
  composer.gotoScene( "xxx", "fade", 0 )  
 end 
end

function scene:hide( event ) 
 local phase = event.phase 
 if "will" == phase then 
  print( "((hiding scene RestartDummy's view))" )  
 end 
end

function scene:destroy( event )
 print( "((destroying scene RestartDummy's view))" )
end


-- Listener setup
scene:addEventListener( "create", scene )
scene:addEventListener( "show", scene )
scene:addEventListener( "hide", scene )
scene:addEventListener( "destroy", scene )

return scene

2015年4月21日 星期二

[Corona SDK] How can we change the size and color of button text?

If we want to add a button, we can use the newButton funtion provided by widget, as the example shown below:
local widget = require( "widget" )
local button1Press = function( event )
 print("button1 pressed")
end

local button1 = widget.newButton
{
 defaultFile = "buttonYellow.png",
 overFile = "buttonYellowOver.png",
 label = "botton 1",     
 onPress = button1Press,
}
defaultFile is to set the default picture,
overFile is to get the picture when use press this button.
The text on button is "botton 1".
However, its size and color are as default.
If we want to change them, we can reference the following codes:
local widget = require( "widget" )
local button1Press = function( event )
  print("button1 pressed")
end

local button1 = widget.newButton
{
  defaultFile = "buttonYellow.png",
  overFile = "buttonYellowOver.png",
  label = "botton 1", 
  font = native.systemFont,
  fontSize = 20,
  emboss = true,
  labelColor = { default = { 0.5, 1, 1 }, over = { 0.5, 0.5, 0.5} },    
  onPress = button1Press,
}

2015年4月16日 星期四

[Corona SDK] How to get the files list of some directory?

If we want to get the list of all files in a directory, we can use the LuaFileSystem.
It is convenient for us to show the pictures, especially when we are developing the APP for showing album.
Example:
dir = "/myDir"
for file in lfs.dir(dir) do
    if (file ~= '.' and file ~= '..') then
        print(file)
    end
end
The files and directories will be all listed.
The example below can show the list of all files and directories in current directory, and all files and directories of its sub-directory.
dir = "."
for file in lfs.dir(dir) do
    if (file ~= '.' and file ~= '..') then
     print(file)
        if(lfs.attributes(file,"mode") == "directory") then        
         for subFile in lfs.dir(file) do
          if (subFile ~= '.' and subFile ~= '..') then
          print(file.."/"..subFile)
          end
         end
        end
    end
end

2015年4月13日 星期一

[Corona SDK] How to deal with collision of two objects with irregular shapes using physics.addBody()?

Below is a simple example for physical collision:
local physics = require( "physics" )
physics.start()

local sky = display.newImage( "bkg_clouds.png", 160, 195 )

local ground = display.newImage( "ground.png", 160, 445 )

physics.addBody( ground, "static", { friction=0.5, bounce=0.3 } )

local crate = display.newImage( "crate.png", 180, -50 )
crate.rotation = 5

physics.addBody( crate, { density=3.0, friction=0.5, bounce=0.3 } )
The pictures used are shown below:
bkg_clouds.png

crate.png

ground.png
The result after collision:

However, in real world, most objects are not in regular shape.
Let us modify crate.png and gound.png as below:
crate.png

ground.png
Check the result again:
It seems that the collision is as the result of before changing.
Why?

Actually, we can specify the shape of object in physics.addBody(), such as rectangular body, circular body, polygonal body, and so on.
Here we use the outline of the original object got from graphics.newOutline().
The codes are modified as below:
local physics = require( "physics" )
physics.start()

local sky = display.newImage( "bkg_clouds.png", 160, 195 )

local ground = display.newImage( "ground.png", 160, 445 )
local ground_outline = graphics.newOutline( 2, "ground.png" )
physics.addBody( ground, "static", { friction=0.5, bounce=0.3,outline=ground_outline } )


local crate = display.newImage( "crate.png", 180, -50 )
crate.rotation = 5
local image_outline = graphics.newOutline( 2, "crate.png" )
physics.addBody( crate, { density=0.2, friction=0.5, bounce=0.3,outline=image_outline} )
The first parameter of graphics.newOutline() is to specify the coarseness of the outline.
Let's check the result again: