2015年4月30日 星期四

[Corona SDK] How to design Segmented Control with our own style?

Segmented Control is very useful in widget tools.
Assume that we have 4 items for user to select.
We can use the following example:
display.setStatusBar( display.HiddenStatusBar )
local widget = require( "widget" )
-- Listen for segmented control events      
local function onSegmentPress( event )
    local target = event.target
    print( "Segment Label is:", target.segmentLabel )
    print( "Segment Number is:", target.segmentNumber )
end

-- Create a default segmented control
local segmentedControl = widget.newSegmentedControl
{
    left = 36,
    top = 150,
    segmentWidth = 24,
    segments = { "1", "2", "3", "4" },
    defaultSegment = 2,
    onPress = onSegmentPress
}
Check the result:

Not bad...
However, you will find that the width of item can be adjusted by segmentWidth.
How about the height value? 
It seems that we cannot modify it.
On the other hand, we may want to have our own style.
How to do?

First, we need to prepare a image file as the source of ImageSheet.
It should include 7 pictures, which are the left/middle/right frames for unselected items, and the left/middle/right frames for selected items. The last one is the divider of segment frame.
The image file:
The codes should be modified as below:
display.setStatusBar( display.HiddenStatusBar )
local widget = require( "widget" )
-- Listen for segmented control events      
local function onSegmentPress( event )
    local target = event.target
    print( "Segment Label is:", target.segmentLabel )
    print( "Segment Number is:", target.segmentNumber )
end

local options = {
     frames = 
     {
         { x=0, y=0, width=24, height=20 },
         { x=26, y=0, width=24, height=20 },
         { x=52, y=0, width=24, height=20 },
         { x=78, y=0, width=24, height=20 },
         { x=104, y=0, width=24, height=20 },
         { x=130, y=0, width=24, height=20 },
         { x=156, y=0, width=1, height=20 }
     },
     sheetContentWidth = 157,
     sheetContentHeight = 20
 }
 local segmentSheet = graphics.newImageSheet( "imageSheet.png", options )
 local segmentedControl = widget.newSegmentedControl
 {
     left = 100,
     top = 100,     

     sheet = segmentSheet,
     leftSegmentFrame = 1,
     middleSegmentFrame = 2,
     rightSegmentFrame = 3,
     leftSegmentSelectedFrame = 4,
     middleSegmentSelectedFrame = 5,
     rightSegmentSelectedFrame = 6,
     segmentFrameWidth = 24,
     segmentFrameHeight = 20,

     dividerFrame = 7,
     dividerFrameWidth = 1,
     dividerFrameHeight = 20,

     labelSize=12,
  labelColor = { default={ 0.5, 0.5, 0.5 }, over={ 1, 1, 1 } },
     segmentWidth = 24,
     segments = { "1", "2", "3", "4", "5"},
     defaultSegment = seg,
     onPress = onSegmentPress
 } 
Check the result:
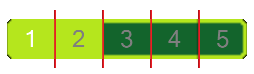
It does not look right. 
There are two issues. 
First, item 1 and item 2 are highlighted at the same time.
Second, the height of divider is not correct. It is system default setting, but not 20 as expected.

For issue 1, we can modify the width for frame 4 (leftSegmentSelectedFrame).
We just minus it by the width of divider:
local options = {
     frames = 
     {
         { x=0, y=0, width=24, height=20 },
         { x=26, y=0, width=24, height=20 },
         { x=52, y=0, width=24, height=20 },
         { x=78, y=0, width=23, height=20 },
         { x=104, y=0, width=24, height=20 },
         { x=130, y=0, width=24, height=20 },
         { x=156, y=0, width=1, height=20 }
     },
     sheetContentWidth = 157,
     sheetContentHeight = 20
 }
That is, we need to let its value to be less than segmentWidth.

For issue 2, we need to remove segmentedControl and add it again:
local segmentedControl = widget.newSegmentedControl
 {
     left = 100,
     top = 100,     

     sheet = segmentSheet,
     leftSegmentFrame = 1,
     middleSegmentFrame = 2,
     rightSegmentFrame = 3,
     leftSegmentSelectedFrame = 4,
     middleSegmentSelectedFrame = 5,
     rightSegmentSelectedFrame = 6,
     segmentFrameWidth = 24,
     segmentFrameHeight = 20,

     dividerFrame = 7,
     dividerFrameWidth = 1,
     dividerFrameHeight = 20,

     labelSize=12,
  labelColor = { default={ 0.5, 0.5, 0.5 }, over={ 1, 1, 1 } },
     segmentWidth = 24,
     segments = { "1", "2", "3", "4", "5"},
     defaultSegment = seg,
     onPress = onSegmentPress
 } 
 segmentedControl:removeSelf( )
 local segmentedControl = widget.newSegmentedControl
 {
     left = 100,
     top = 100,     

     sheet = segmentSheet,
     leftSegmentFrame = 1,
     middleSegmentFrame = 2,
     rightSegmentFrame = 3,
     leftSegmentSelectedFrame = 4,
     middleSegmentSelectedFrame = 5,
     rightSegmentSelectedFrame = 6,
     segmentFrameWidth = 24,
     segmentFrameHeight = 20,

     dividerFrame = 7,
     dividerFrameWidth = 1,
     dividerFrameHeight = 20,

     labelSize=12,
  labelColor = { default={ 0.5, 0.5, 0.5 }, over={ 1, 1, 1 } },
     segmentWidth = 24,
     segments = { "1", "2", "3", "4", "5"},
     defaultSegment = seg,
     onPress = onSegmentPress
 } 
The final result:
The method shown above is just a workaround....

[Corona SDK] 如何設計自己風格的Segmented Control?

Segmented Controlwidget裡相當好用的一種,
假設你有4個items選項讓使用者設定,
用以下範例即可:
display.setStatusBar( display.HiddenStatusBar )
local widget = require( "widget" )
-- Listen for segmented control events      
local function onSegmentPress( event )
    local target = event.target
    print( "Segment Label is:", target.segmentLabel )
    print( "Segment Number is:", target.segmentNumber )
end

-- Create a default segmented control
local segmentedControl = widget.newSegmentedControl
{
    left = 36,
    top = 150,
    segmentWidth = 24,
    segments = { "1", "2", "3", "4" },
    defaultSegment = 2,
    onPress = onSegmentPress
}
得到的結果:

不過,你會發現,每個item的寛度可以透過segmentWidth來設定,
那高度呢?好像無法改變耶...
或者,我們想要有自己特別的風格呢? 

首先,你必須準備好一張圖,當成ImageSheet的來源,
它裡面要含有7張圖形,分別是item未選取的左框/中框/右框, 以及選到時的左框/中框/右框,最後一張是item中間的分隔線,
圖形內容如下:
程式改寫如下:
display.setStatusBar( display.HiddenStatusBar )
local widget = require( "widget" )
-- Listen for segmented control events      
local function onSegmentPress( event )
    local target = event.target
    print( "Segment Label is:", target.segmentLabel )
    print( "Segment Number is:", target.segmentNumber )
end

local options = {
     frames = 
     {
         { x=0, y=0, width=24, height=20 },
         { x=26, y=0, width=24, height=20 },
         { x=52, y=0, width=24, height=20 },
         { x=78, y=0, width=24, height=20 },
         { x=104, y=0, width=24, height=20 },
         { x=130, y=0, width=24, height=20 },
         { x=156, y=0, width=1, height=20 }
     },
     sheetContentWidth = 157,
     sheetContentHeight = 20
 }
 local segmentSheet = graphics.newImageSheet( "imageSheet.png", options )
 local segmentedControl = widget.newSegmentedControl
 {
     left = 100,
     top = 100,     

     sheet = segmentSheet,
     leftSegmentFrame = 1,
     middleSegmentFrame = 2,
     rightSegmentFrame = 3,
     leftSegmentSelectedFrame = 4,
     middleSegmentSelectedFrame = 5,
     rightSegmentSelectedFrame = 6,
     segmentFrameWidth = 24,
     segmentFrameHeight = 20,

     dividerFrame = 7,
     dividerFrameWidth = 1,
     dividerFrameHeight = 20,

     labelSize=12,
  labelColor = { default={ 0.5, 0.5, 0.5 }, over={ 1, 1, 1 } },
     segmentWidth = 24,
     segments = { "1", "2", "3", "4", "5"},
     defaultSegment = seg,
     onPress = onSegmentPress
 } 
看一下執行結果:
好像不太對, 有二個問題,
一個是item 1和item 2,同時highlight了,
另一個是divider的高度,好像是系統預的,不是我們設定的20, 

第一個問題,可以修改frames裡第4個frame (leftSegmentSelectedFrame)的寬度,
我們將它減掉divider的寬度:
local options = {
     frames = 
     {
         { x=0, y=0, width=24, height=20 },
         { x=26, y=0, width=24, height=20 },
         { x=52, y=0, width=24, height=20 },
         { x=78, y=0, width=23, height=20 },
         { x=104, y=0, width=24, height=20 },
         { x=130, y=0, width=24, height=20 },
         { x=156, y=0, width=1, height=20 }
     },
     sheetContentWidth = 157,
     sheetContentHeight = 20
 }
也就說,讓它寛度比segmentWidth小即可, 

第二個問題,可以將segmentedControl移除再加一次即可:
local segmentedControl = widget.newSegmentedControl
 {
     left = 100,
     top = 100,     

     sheet = segmentSheet,
     leftSegmentFrame = 1,
     middleSegmentFrame = 2,
     rightSegmentFrame = 3,
     leftSegmentSelectedFrame = 4,
     middleSegmentSelectedFrame = 5,
     rightSegmentSelectedFrame = 6,
     segmentFrameWidth = 24,
     segmentFrameHeight = 20,

     dividerFrame = 7,
     dividerFrameWidth = 1,
     dividerFrameHeight = 20,

     labelSize=12,
  labelColor = { default={ 0.5, 0.5, 0.5 }, over={ 1, 1, 1 } },
     segmentWidth = 24,
     segments = { "1", "2", "3", "4", "5"},
     defaultSegment = seg,
     onPress = onSegmentPress
 } 
 segmentedControl:removeSelf( )
 local segmentedControl = widget.newSegmentedControl
 {
     left = 100,
     top = 100,     

     sheet = segmentSheet,
     leftSegmentFrame = 1,
     middleSegmentFrame = 2,
     rightSegmentFrame = 3,
     leftSegmentSelectedFrame = 4,
     middleSegmentSelectedFrame = 5,
     rightSegmentSelectedFrame = 6,
     segmentFrameWidth = 24,
     segmentFrameHeight = 20,

     dividerFrame = 7,
     dividerFrameWidth = 1,
     dividerFrameHeight = 20,

     labelSize=12,
  labelColor = { default={ 0.5, 0.5, 0.5 }, over={ 1, 1, 1 } },
     segmentWidth = 24,
     segments = { "1", "2", "3", "4", "5"},
     defaultSegment = seg,
     onPress = onSegmentPress
 } 
最後結果:
上面的方法都只是workaround...

2015年4月29日 星期三

[Corona SDK] How can we decide if the collision will happen or not for each object?

In [Corona SDK] How to detect the collision for physical objects - using Global Collision, we find that all objects will collide with each other.
We can then decide how to deal with the collision in function onGlobalCollision().
What if we wish that fruit1 and fruit2 will not collide with each other?
For it, we need to add the parameter filter, as shown below:
local main = display.newImage( "main.png", 160, 240 )
local mainCollisionFilter = { categoryBits=2, maskBits=1023 } 
physics.addBody( main, { density = 1.0, friction = 0.3, bounce = 0.2 , filter=mainCollisionFilter} )
main.myName = "main"

local fruit1 = display.newImage( "fruit.png", 100, 120 )
local fruit1CollisionFilter = { categoryBits=4, maskBits=2 } 
physics.addBody( fruit1, { density = 1.0, friction = 0.3, bounce = 0.2, filter=fruit1CollisionFilter} )
fruit1.myName = "fruit1"

local fruit2 = display.newImage( "fruit.png", 300, 220 )
local fruit2CollisionFilter = { categoryBits=8, maskBits=6 } 
physics.addBody( fruit2, { density = 1.0, friction = 0.3, bounce = 0.2, filter=fruit2CollisionFilter } )
fruit2.myName = "fruit2"

local fruit3 = display.newImage( "fruit.png", 300, 220 )
physics.addBody( fruit3, { density = 1.0, friction = 0.3, bounce = 0.2 } )
fruit3.myName = "fruit3"
The parameter categoryBits is used to set the category of that object.
Basically, this value will be unique for each object if we want to distinguish them.
categoryBits is set in bit level since it will cooperate with maskBits.
Of course, we can set the same categoryBits for different objects, if we want them to have similar behaviors. 
categoryBits can also be set to 1 for multiple bits, such as 7.
The final behavior will be decided by the result of mask operation with maskBits.
We can show the filter setting of above codes by the chart:
For fruit3, it does not specify the parameter filter. Its default setting will be { categoryBits=1, maskBits=1023 }, which means that it will collide with all other objects.
It there may have some objects without filter setting, we'd better set categoryBits start from 2 for those object with filter.
Besides, in the example, the maskBits for fruit2 is 6. It means that it wish to collide with main and fruit1.
However, the maskBits for fruit1 is 2, which means that it does not want to collide with fruit2.
The mask operation is the result of AND for all values.
fruit1 will not collide with fruit2 in the end.

[Corona SDK] 如何決定各個物體間的碰撞發生與否?

[Corona SDK] 如何偵測物體碰撞 - 利用Global Collision裡,我們會發現所有的物體都會互相碰撞,
我們可以在onGlobalCollision()去決定要如何處理碰撞,
假設我們希望fruit1fruit2不會互相碰撞,要怎麼處理呢?
此時我們就必須增加filter的參數,如以下範例:
local main = display.newImage( "main.png", 160, 240 )
local mainCollisionFilter = { categoryBits=2, maskBits=1023 } 
physics.addBody( main, { density = 1.0, friction = 0.3, bounce = 0.2 , filter=mainCollisionFilter} )
main.myName = "main"

local fruit1 = display.newImage( "fruit.png", 100, 120 )
local fruit1CollisionFilter = { categoryBits=4, maskBits=2 } 
physics.addBody( fruit1, { density = 1.0, friction = 0.3, bounce = 0.2, filter=fruit1CollisionFilter} )
fruit1.myName = "fruit1"

local fruit2 = display.newImage( "fruit.png", 300, 220 )
local fruit2CollisionFilter = { categoryBits=8, maskBits=6 } 
physics.addBody( fruit2, { density = 1.0, friction = 0.3, bounce = 0.2, filter=fruit2CollisionFilter } )
fruit2.myName = "fruit2"

local fruit3 = display.newImage( "fruit.png", 300, 220 )
physics.addBody( fruit3, { density = 1.0, friction = 0.3, bounce = 0.2 } )
fruit3.myName = "fruit3"
其中,categoryBits是用來設定物體的類別,原則上每個物體都會不同,這樣才能區分,
因為要配合後面的maskBits,所以categoryBits設定也是以bit為操作,
當然,不同物體也可以設定成同一個categoryBits值,如果你希望它們的行為是類似的話,
categoryBits也可以是多個bits為1,例如7,
最後的行為都是看和maskBits執行mask的結果,
將上面範例整理成圖表方式:
fruit3並沒有設定filter,它的預設值就會變成{ categoryBits=1, maskBits=1023 }
也就是說,它會和任何物體碰撞,
如果有些物體有設定filter,有些物體沒有設定,
那麼,那些有設定filtercategoryBits,最好是從2開始,才能區分,

另外,範例中,雖然fruit2maskBits是6,也就是說,它希望能和main以及fruit1碰撞,
但是因為fruit1maskBits為2,fruit1不希望和fruit2碰撞,
mask執行是所有設定值執行AND的結果,所以fruit1fruit2並不會發生碰撞

[Corona SDK] How to detect the collision for physical objects - using Global Collision

For detection of collision, we can use Local Collision or Global Collision.
Below is the usage of Global Collision:
local main = display.newImage( "mainRole.png", 160, 240 )
physics.addBody( main, { density = 1.0, friction = 0.3, bounce = 0.2 } )
main.myName = "mainRole"

local fruit1 = display.newImage( "fruit.png", 100, 120 )
physics.addBody( fruit1, { density = 1.0, friction = 0.3, bounce = 0.2 } )
fruit1.myName = "fruit1"

local fruit2 = display.newImage( "fruit.png", 300, 220 )
physics.addBody( fruit2, { density = 1.0, friction = 0.3, bounce = 0.2 } )
fruit2.myName = "fruit2"

local function onGlobalCollision( event )

    if ( event.phase == "began" ) then        
        if((event.object1.myName=="mainRole" and event.object2.myName=="fruit1") or (event.object1.myName=="fruit1 and event.object2.myName=="mainRole")) then
         print( "began: " .. event.object1.myName .. " and " .. event.object2.myName )         
         if(fruit1 ~= nil) then
          print("Remove fruit1")
          fruit1:removeSelf( )
    fruit1 = nil
         end
        elseif((event.object1.myName=="mainRole" and event.object2.myName=="fruit2") or (event.object1.myName=="fruit2" and event.object2.myName=="mainRole")) then
         print( "began: " .. event.object1.myName .. " and " .. event.object2.myName )         
         if(fruit2 ~= nil) then
          print("Remove fruit2")
          fruit2:removeSelf( )
    fruit2 = nil
         end
        end

    elseif ( event.phase == "ended" ) then
        print( "ended: " .. event.object1.myName .. " and " .. event.object2.myName )
    end
end

Runtime:addEventListener( "collision", onGlobalCollision )
We add the specific name for each object.
When the collision happens, we can know which two objects collide with each other by verify the object names.

However, when we run the codes shown above, we may find that sometimes Runtime error will happen.
In executing fruit1:removeSelf( ), it will tell you that fruit1 is nil.
It is strange since we do check if(fruit1 ~= nil).
For fruit2, the problem is similar.

From the log message, the code print( "began: " .. event.object1.myName .. " and " .. event.object2.myName ) may run few times, and then execute print("Remove fruit1") after that.
It seems that this function is multi-entry.
multi-entry function without critical section mechanism to protect it is liable to corrupt the data.
To solve this problem, we can make the removal of objects to other place, like the following codes:
local removeFruit1 = false
local removeFruit2 = false
local main = display.newImage( "mainRole.png", 160, 240 )
physics.addBody( main, { density = 1.0, friction = 0.3, bounce = 0.2 } )
main.myName = "mainRole"

local fruit1 = display.newImage( "fruit.png", 100, 120 )
physics.addBody( fruit1, { density = 1.0, friction = 0.3, bounce = 0.2 } )
fruit1.myName = "fruit1"

local fruit2 = display.newImage( "fruit.png", 300, 220 )
physics.addBody( fruit2, { density = 1.0, friction = 0.3, bounce = 0.2 } )
fruit2.myName = "fruit2"

local function onGlobalCollision( event )

    if ( event.phase == "began" ) then        
        if((event.object1.myName=="mainRole" and event.object2.myName=="fruit1") or (event.object1.myName=="fruit1 and event.object2.myName=="mainRole")) then
         print( "began: " .. event.object1.myName .. " and " .. event.object2.myName )         
         removeFruit1 = true
        elseif((event.object1.myName=="mainRole" and event.object2.myName=="fruit2") or (event.object1.myName=="fruit2" and event.object2.myName=="mainRole")) then
         print( "began: " .. event.object1.myName .. " and " .. event.object2.myName )         
         removeFruit2 = true
        end

    elseif ( event.phase == "ended" ) then
        print( "ended: " .. event.object1.myName .. " and " .. event.object2.myName )
    end
end

Runtime:addEventListener( "collision", onGlobalCollision )

local function removeAction()
 if(removeFruit1) then
   if(fruit1 ~= nil) then
      print("Remove fruit1")
      fruit1:removeSelf( )
      fruit1 = nil
      removeFruit1 = false
   end
 end
 if(removeFruit2) then
   if(fruit2 ~= nil) then
     print("Remove fruit2")
     fruit2:removeSelf( )
     fruit2 = nil
     removeFruit2 = false
   end
 end 
end
 
timer.performWithDelay( 50, removeAction,-1 )

2015年4月28日 星期二

[Corona SDK] How to detect double-tapped?

If we want to check if user has touched the screen, we can use Tap Detection or Touch Detection.
If we want to know if user has double-tapped the screen, to use Tap Detection is better.
Example shown as below:
local function buttonListener( event )

    if ( event.numTaps == 1 ) then
        print( "single-tapped" )
        runSingleTappedAction()
    elseif ( event.numTaps == 2 ) then
        print( "double-tapped" )
        runDoubleTappedAction()
    else
        return true
    end
end

local myButton = display.newRect( 160, 240, 120, 60 )
myButton:addEventListener( "tap", buttonListener )
For double-tapped, it will happen following single-tapped event.
That is, it will execute runSingleTappedAction() first, and then execute runDoubleTappedAction().
What if we do not want to execute runSingleTappedAction() for double-tapped event?
To achieve that, we should wait for a while before running action, since we need to confirm if it is single-tapped or double-tapped.
Example shown below:
local tapCount=0
local timeId = nil
function runTapAction( event )
 if ( tapCount == 1 ) then
     print( "single-tapped" )   
     runSingleTappedAction() 
 elseif ( tapCount == 2 ) then
     print( "double-tapped" )
     runDoubleTappedAction()
 end
end

local function buttonListener( event )
 tapCount = event.numTaps
 if(timeId ~= nil) then
   timer.cancel( timeId )
 end
 timeId = timer.performWithDelay( 200, runTapAction,1 )
end

local myButton = display.newRect( 160, 240, 120, 60 )
myButton:addEventListener( "tap", buttonListener )
Of course, we will sacrifice the response time for single-tapped event.

[Corona SDK] 如何偵測在螢幕雙擊?

如果要偵測使用者是否有觸控到螢幕,
使用Tap DetectionTouch Detection都可以,
但如果想偵測雙擊的動作,那使用tap detection會簡單些,
範例如下:
local function buttonListener( event )

    if ( event.numTaps == 1 ) then
        print( "single-tapped" )
        runSingleTappedAction()
    elseif ( event.numTaps == 2 ) then
        print( "double-tapped" )
        runDoubleTappedAction()
    else
        return true
    end
end

local myButton = display.newRect( 160, 240, 120, 60 )
myButton:addEventListener( "tap", buttonListener )
雙擊時,一定是先發生單擊事件,然後才是雙擊事件,
也就是說,會執行runSingleTappedAction(),然後才是runDoubleTappedAction(),
如果雙擊時,不想執行runSingleTappedAction(),
那就必需等一段時間確認是單擊或雙擊再執行,
如以下用法:
local tapCount=0
local timeId = nil
function runTapAction( event )
 if ( tapCount == 1 ) then
     print( "single-tapped" )   
     runSingleTappedAction() 
 elseif ( tapCount == 2 ) then
     print( "double-tapped" )
     runDoubleTappedAction()
 end
end

local function buttonListener( event )
 tapCount = event.numTaps
 if(timeId ~= nil) then
   timer.cancel( timeId )
 end
 timeId = timer.performWithDelay( 200, runTapAction,1 )
end

local myButton = display.newRect( 160, 240, 120, 60 )
myButton:addEventListener( "tap", buttonListener )
當然,以上的作法會犠牲單擊的反應速度